Network and webserver
In the network settings, data for access within the network is recorded.
As such count on the one hand the media directories. In the media directories file attachments and pictures are deposited, in order not to expand the data base unnecessarily. In a local data base, media data can be recorded in a local directory / in the user data. In the networking, the media directories must be accessible from every client. Respectively, a share for the single directories has to be created, and the paths have to be recorded in a form accessible from every client. If the directories are not accessible from a particular client, the user receives a respective error notice at login.
The SMTP data is recorded during the network configuration on the other hand, if the documents shall be sent as an email (without MAPI interface, comp. program settings /projects dunning).
The sender’s email address, the SMTP server that hosts them, the SMTP login and the SMTP password have to be recorded. The SSL encryption has to be activated, if appropriate. The necessary data can be asked from the provider.
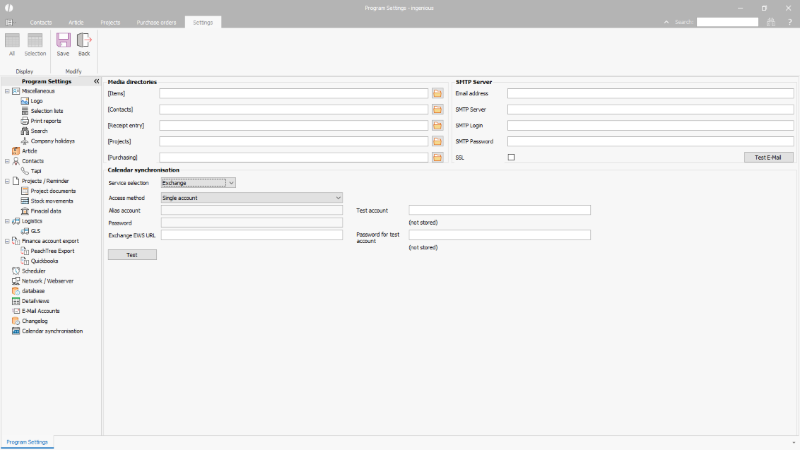 |
| Configuration of the network and web server options |
Calendar synchronization
Entries from time recording / scheduling can be synchronized with external calendars (e.g. Microsoft Exchange Server). At this point, the corresponding service must be selected and the URL of the Exchange Web Service entered. The type of access must also be determined. In the case of a representative position or a change of identity, the alias service account must be stored with the associated password.
Regardless of the type of access, for each user whose appointments are to be synchronized the user alias must be stored in the user administration. The password is also required if the type of access is to be made using a single account.
Access can be tested using the “Test” button.
Overview and configuration of the access types
Single account
The single account access type is recommended for individual accounts for which synchronization is to be set up. When accessing individual accounts, each user must store their Exchange alias password in the user details. No settings are necessary in the exchange server.
Service account representative position
The access type representative position is suitable for the configuration of fewer accounts. The agent account “sends on behalf of”. For access via a service account with representative status, the distribution account must be saved with a password.
Exchange rules set up
The representative regulation serves to give one person / service access rights to another person’s account. (e.g. as part of a representation)
The representative rule is managed via the Exchange management console, on current Exchange servers specifically via the web portal “Exchange Administrative Center”. The registration must be made with an administration account.
After logging on to the portal, double-click on the profile for which the representative rule is to be set up, i.e. the user who should be the representative, from the list of recipients. In the details of the user mailbox, full access must be created for all accounts for whose calendars entries are to be synchronized via the Ingenious calendar synchronization under the item mailbox representative.
 |
| Set Exchange rules for service account representative |
Impersonation
Impersonation is useful if you want to access many or all of the calendars in an Exchange database or if the user should act as the owner rather than “on behalf”. For access via a service account with identity change, the distribution account must be stored with a password.
Exchange impersonation setup
The following elements are required to configure an impersonation:
- A domain service account that is used to perform the impersonation. For these instructions, the name of the account is “distributor account”.
- A domain distribution group that will later add the accounts for which you want to impersonate
- An Exchange “write area” with which Exchange can be informed for which domain group the impersonation applies
- An administration role in Exchange that connects everything.
Creation of the distribution group
For the sake of clarity, the distribution group is created here in a separate organizational unit.
The following values are required for the system:
- Name of the new group, here “Test-ewsimpersonateUser”
- Display name of the group, here also “Test-ewsimpersonateUser”
- Group type, fixed “Distribution”
- Name of the organizational unit, here “test distributor”
- Domain name, e.g. “Company.Org”
To create the group, the “Exchange Management Shell” has to be executed:
New-Distributiongroup -name “Test-ewsimpersonateUser” -Displayname “Test-ewsimpersonateUser” -Type “Distribution” -Organizationalunit “OU=TestVerteiler,DC= company,DC=org”
(Without line break)
The command is used to list the existing distribution groups:
Get-Distibutiongroup
The following command can be used to list the details of a group:
Get-Distributiongroup Test-ewsimpersonateUser|fl
The appendix “|fl” forces the listing of the properties, without only a general overview would be shown.
Create writing area / management scope for Exchange
The following values are required for this:
- Name of the area, here “TestImpersonateScope”
- Path to domain group from previous step
The following command must also be executed in the “Exchange Management Shell”:
New-ManagementScope -Name:”TestImpersonateScope” -RecipientRestrictionFilter {MemberOfGroup -eq “CN=Test-ewsimpersonateUser,OU=TestVerteiler,DC= company,DC=org”}
(Without line break)
A list of already created writing areas is listed with the command:
Get-ManagementScope
Details of a writing area are given accordingly:
Get-ManagementScope TestImpersonateScope|fl
The attachment “|fl” forces the detailed display.
Create administration role in Exchange
The administration roles are created in the Exchange management console, on current Exchange servers via the web portal “Exchange Administrative Center”. The registration must be made with an administration account.
After logging in, click on “Permissions” in the list on the left. Possibly. is now to switch to the “Administration roles” list in the upper area:
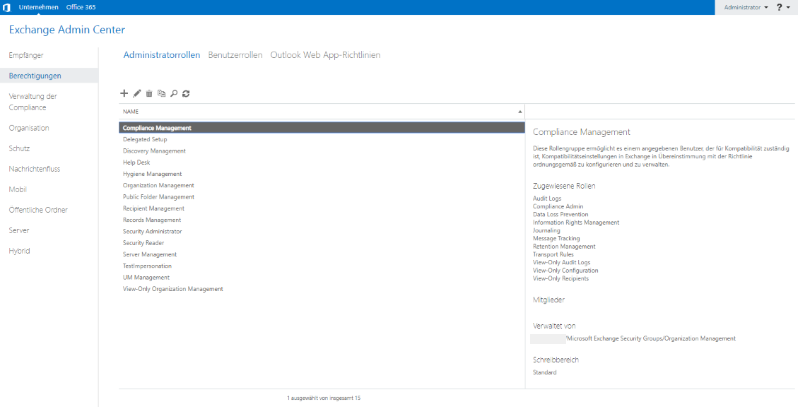 |
| Create administration role in Exchange |
Editing is opened by double-clicking on an entry. New roles are created by clicking on the plus symbol. In both cases, an input mask opens.
The following values must be entered here:
Name: Name of the administration role, here “TestImpersonation”
Description: A description of the role
Writing area: Select the upper radio box -> select the management scope from the previous steps from the dropdown box
Roles: This is the list of assigned rights / functions
Click on Plus and select “ApplicationImpersonation” from the list of roles.
Members: List of domain accounts that are allowed to impersonate. The list for selecting the user is opened via the plus button.
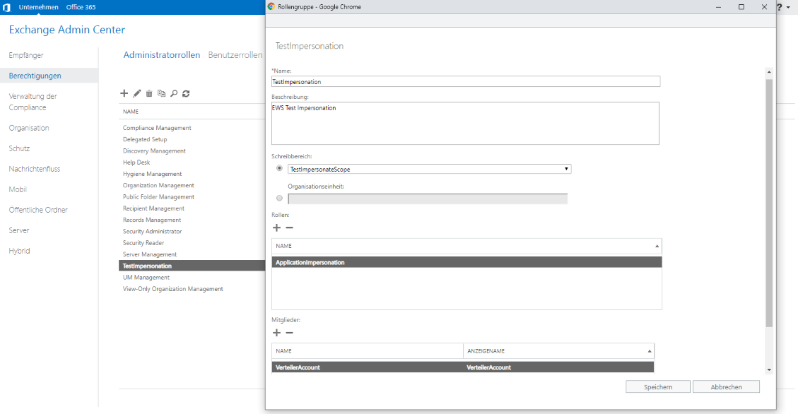 |
| Creation of the administration role in Exchange |
If the administration role was created correctly, there is a corresponding entry in the “AD Users and Computers” list under “Microsoft Exchange Security Groups”.
The entry can be edited with a double click. The entry “Distribution Account” should now be visible in the “Members” tab.
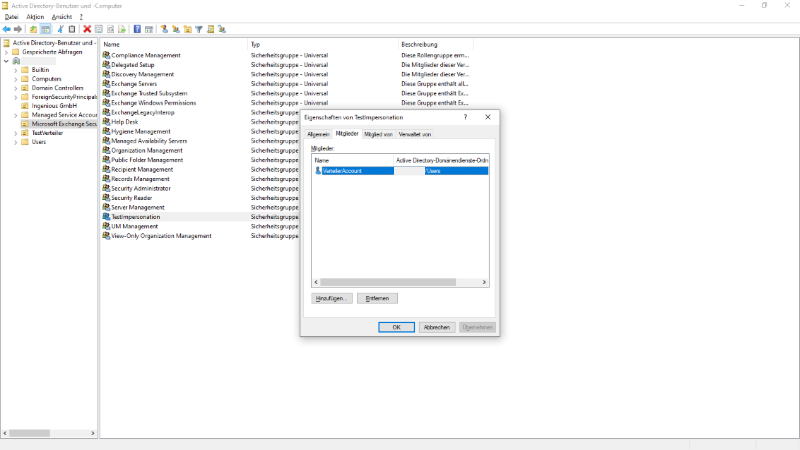 |
| Administration role for impersonation in the Active Directory |
Assignment of users for whom impersonation is to be allowed
Finally, in the distribution group “Test-ewsimpersonateUser” the list of users for whom the impersonation is to be carried out must be maintained:
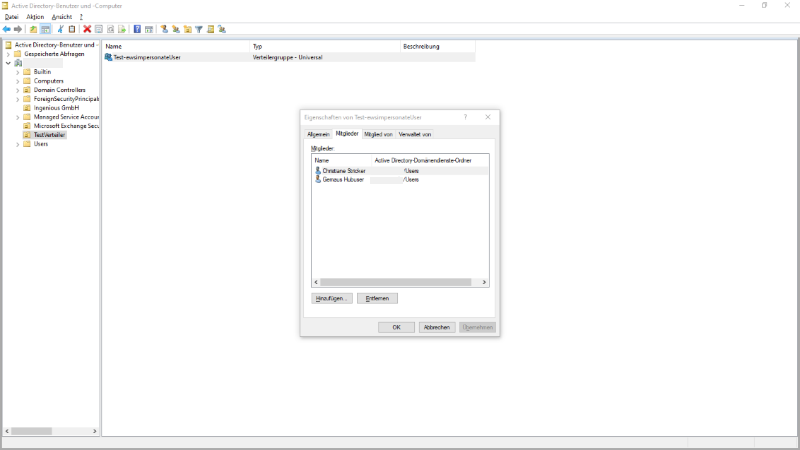 |
| Impersonated users |

