Create a new project
The creation of a ne project starts with the button ![]() in the projects list- or detail view. In the appearing dialogue e.g. the project type is selected and the customer thath shall be linked to the project.
in the projects list- or detail view. In the appearing dialogue e.g. the project type is selected and the customer thath shall be linked to the project.
If the project creation was started from the detail vie or from a list view that was filtered for a customer (e.g. when the project list was opened from the contacts with “Show projects”), the customer is already preselected in the creation dialogue.
| Dialogue for creating a new project |
The following details are queried:
| Document | All project types that were configured in the program settings in projects and reminders are to choose from. Usually these are quotation, order confirmation, invoice, delivery note and credit note. A common workflow starts with a quote, from that the following project types will be generated. See also Convert an existing project Also all other project states can directly be created, e.g. when a customer “just now” comes to take away items on stock. Then simply an invoice is created that doesn’t need any other status. |
| Customer | In the field customer the matchcode of that contact has to be entered, for that the project shall be created. With entering the first letters, the type-ahead-search starts and all contacts with type customer are listet that starts with those letters. This way the matchcode can be selected from the list, even if only a part of it is known. If the matchcode is completely unknown and/or the customer shall be searched for by filters from the database, the contact list can be opened by entering the wildcard “*”. With double click the selected customer will be taken over. Alternativly also the customer number can be used for searching the contact. If exactly one customer exists with that customer number, he will directly be taken. If more than one is found, the contact list will be opened with the search results and the customer can be selected with double click. |
| Commission | In the field commission a short name for the project can be entered. |
| Use special prices | Special prices can be stored in the contact details for customers. They will be used, when the checkbox is activated. If the flag is removed, the project prices are calculated with the list prices instead. |
After the confirmation of the project creation dialogue with clicking OK, the project document is generated and opened.
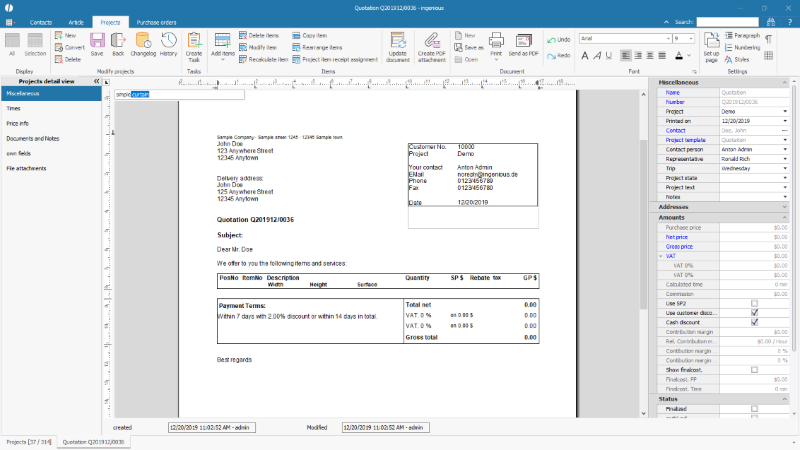
The document is opened in a What-You-See-Is-What-You-Get view. You directly see the document preview where you can work on.
| Project document in the WYSIWYG view |
Each change on project relevant fields, on a project item or on the sums etc. is directly visible. Nearly all project fields can be changed in the right sidebar or directly on the document when they were placed there by placeholders.
If alle changes should be made on the document, it’s recommended to navigate from field to field bu tab key.
Note: Only changes on fields are stored in the database. If texts are entered at any point of the document, they get lost with a refresh of the document. Arbitrarily writing on the document can be prevented by the configuration “free text entry in projects” -> “not possible”. See also Program settings / Projects
Also single fields can be protected from changes. For that the place holders in the text template administration need to get the property “text entry blocked”. See also Text templates / project templates
After setting all miscellaneous project data and texts the project related items will be entered. This is done with the bttons from icon bar or with the known shortcuts. See also Projects / Miscellaneous project data
With headlines, free texts, sums and rebates the project items can be grouped logically.
When entering the items the ingenious product catalogue can be used. Amongst other things with the shortcut Ctrl + A a little search field will be opened, with that the needed article is searched for by using the matchcode and a type-ahead-search.
 |
| Type ahead article search in the project document |
Simple articles will directly be inserted in the document. For part lists a configurator is opened where the needed quantity, measurements and options can be entered and selected.
| Product configurator in the project document |
If multiple similar products shall be entered into the project, it’s recommended to use the function multi item. With shortcut Ctrl + M and search first an article is loaded from product catalogue and configured in a separate table afterwards. That applies equally for simple articles that are needed in different lengths for example and also for part lists that can have different variants besides the measurements, e.g. the control side of a rolling shutter (depending on the scripting code of the part list).
Once configured in the base, entering the measurements and quantities (+ possibly additional options) is done in a minimalist table. Possible part list notes or errors are already checked for and displayed here.
| Measurment entry of a multi item |
Also in the doument possibly errors in the product configuration are indicated.
A little warning symbol ![]() on the document marks an item line that contains a note. A cross on red background
on the document marks an item line that contains a note. A cross on red background ![]() shows that an item is faulty.
shows that an item is faulty.
| Messages about faulty items in the project |
When the faulty project item is selected – by clicking on it or by navigation with tab key, the related note or error message is shown below the document. The notes and also the symbols will not be printed with the document.
| Message about a part list error |
Rearrange items
New project items always will be inserted below a marked item line or, if the cursor is placed at any point of the document outside the item table, it’s inserted in the last line below all other items. If the order does not correspond to the intended possibly because of entering project items or explanatory texts later, the items also can simply be rearranged.
With the button ![]() in the symbol bar or with the function key F5 a pop-up is opened, wherein the items can be rearranged arbitrarily with drag&drop. With OK the new order is confirmed, with Abort it’s discarded.
in the symbol bar or with the function key F5 a pop-up is opened, wherein the items can be rearranged arbitrarily with drag&drop. With OK the new order is confirmed, with Abort it’s discarded.
| Rearrange project items |
Send project document by email
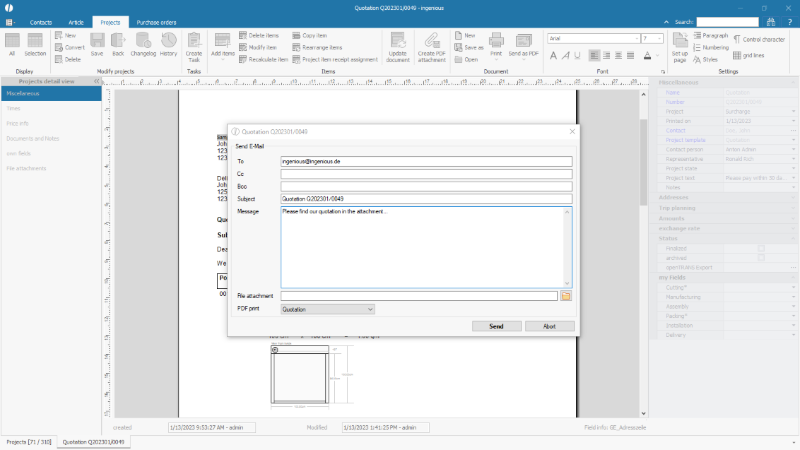
A completed project document can be sent directly to the customer as a PDF attachment to an email using the button ![]() .
.
Depending on the configuration in the program settings , the email is sent with predefined texts via SMTP or via MAPI.
If the corresponding tick is set in the program settings, a window will also open in which texts can be edited and recipients can be added.
Another file attachment can also be added from the computer’s folder structure.
The PDF of the project document is created using the project template selected in the project as seen in the project preview.
A different project template can be selected in the Send Email window.
 |
| Send email window in the project |
Note:
The form for sending the e-mail can be adapted using a script, e.g. expanded.
If changes are made to the form on the program side, the form sizes set in the script may no longer fit.
If individual elements are missing from the form, please contact ingenious support.

